Monday, July 14, 2025

Summer Rolls


SUMMER ROLLS

This is perfect for a nice light summer lunch or snack.  You can use any fresh veggies that you like and make them with any protein.  These are really delicious with Tofu or Shrimp or even better use both!  They can be a little daunting to roll up but once you do a few of them it gets much easier.  I like to make a roll and them cut them in half.  These are perfect with any dipping sauce but my favorite is to dip in a peanut sauce.   I will list a recipe for an easy peanut sauce below as well.

Ingredients:

Summer Rolls
1/2 lb cooked, chilled shrimp
6 rice paper wrappers
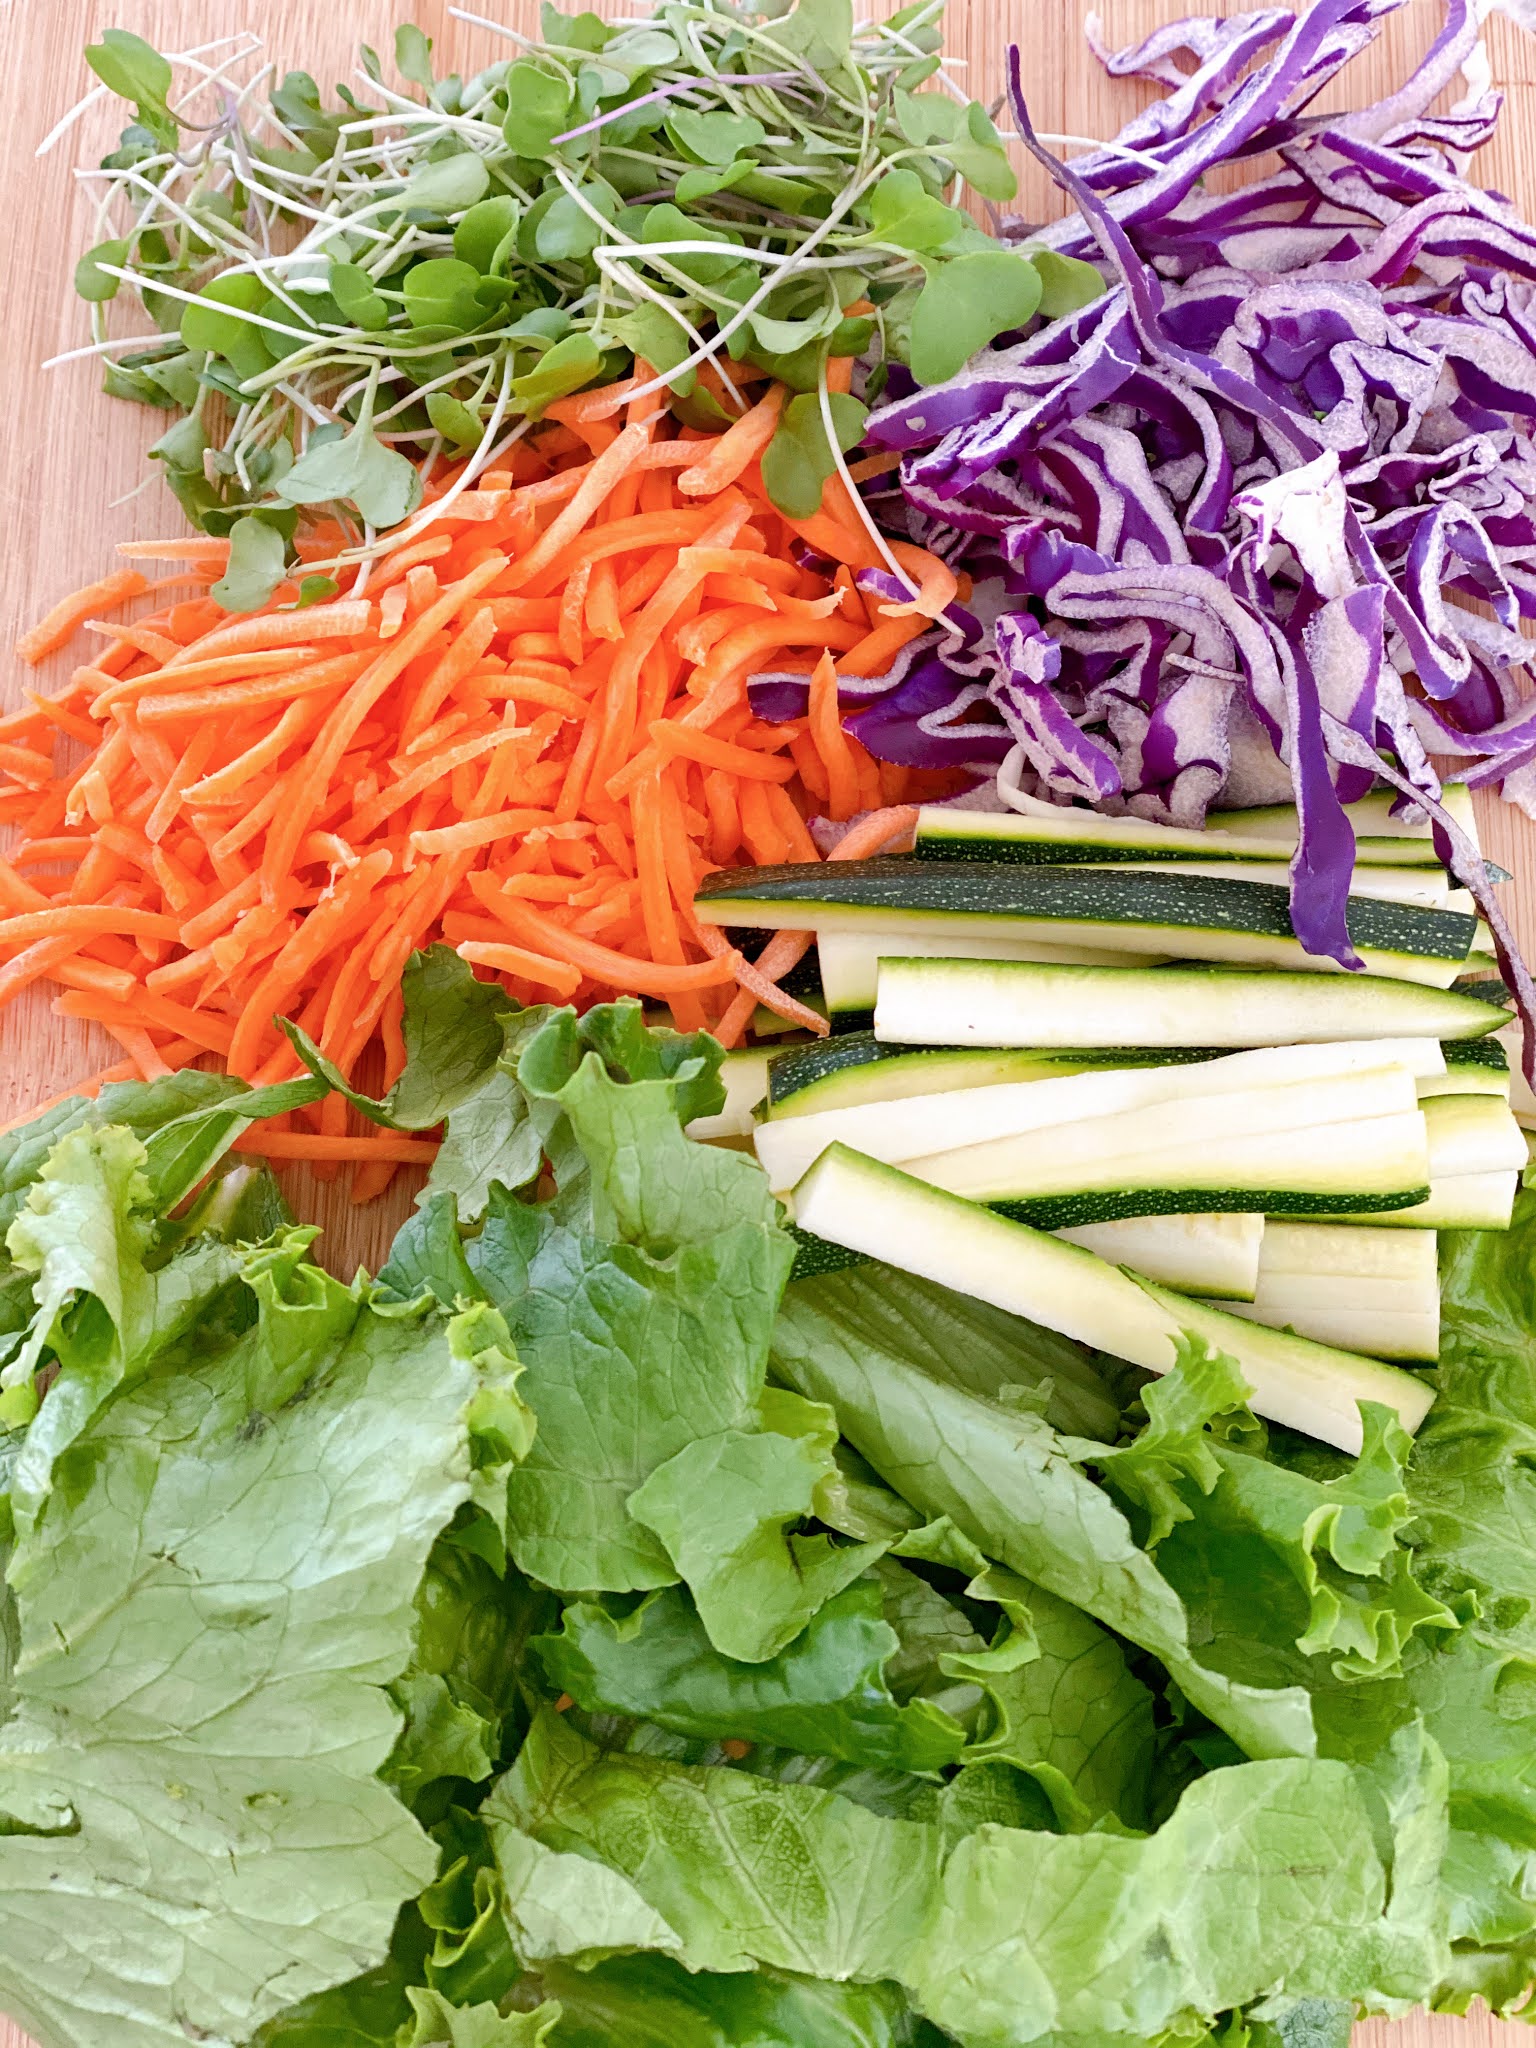
1 cup shredded carrots
1 cup shredded purple cabbage
1 cup sliced zucchini or cucumber
Handful of butter lettuce leaves (or any kind you like)
Handful of micro greens

*Optional additions
cooked rice noodles, chilled
cooked grilled chicken, chilled
tofu, chilled
fresh mint
fresh cilantro

Peanut Sauce
1/2 cup creamy peanut butter
2 tablespoons rice vinegar
2 tablespoons soy sauce
1 teaspoon toasted sesame oil
1 tablespoons pure maple syrup
1/4 cup water or more to thin out sauce


Preparation:

Summer Rolls
Prepare all veggies and shrimp in advance of making your summer rolls.  The shrimp should be cooked, deveined and tails removed.  All veggies should be prepared in long thin slices or shredded.  You can leave the lettuce in larger pieces but roughly chopped.  Have all your ingredients close by on a large plate or platter so you can easily assemble your summer roll.  

Get a large shallow plate or bowl and fill with warm water.  Prepare the rice paper wrappers one at a time.  Dip the wrapper in the warm water and then flip to wet the other side.  Quickly remove from water and place onto a flat workspace.  I like to use a wooden cutting board.  Fill your rolls anyway you like however it is much prettier to arrange the shrimp and colorful veggies nicely in the middle in a single layer so you can see all the ingredients when they are rolled up.  Place lettuce last on top of the shrimp and other veggies.  To roll,  fold the bottom over the top, then fold in the sides and lastly roll up from the bottom to complete your roll.  Slice each roll in half.  These are best if you serve immediately.  You can use a damp towel on the bottom and top of the finished summer rolls as you are making more so they won't dry out.  Serve with peanut sauce and Enjoy!

Peanut Sauce
Place peanut butter in a microwave safe dish and warm slightly in the microwave (about 15 seconds) to melt the peanut butter slightly which will make it easier to stir in the rest of the ingredients.  Add each ingredient and stir to combine well.  If you feel the sauce it too thick add a tiny bit of water a little at a time until you get your desired consistency.
 

Monday, July 22, 2024

CANOLI DIP


CANOLI DIP

This is a delicious, quick and easy dessert that everyone loves.  
Just 4 ingredients that I usually always have on hand.  This dip is great with any cookies or pastry but we love to dip strawberries the most!  This is sure to be a big hit at your next get together!!


Ingredients:

1 - 8 oz block of cream cheese (softened)
1 - 16 oz container of whole milk ricotta cheese
2 cups of confectioners sugar
1 cup of mini chocolate chips

Preparation:

Whip cream cheese and ricotta cheese together until fluffy.  Next add confectioners sugar one cup at a time until fully incorporated.  Lastly, fold in mini chocolate chips.  top with a sprinkle of more mini chocolate chips and a little more confectioners sugar to serve.  Pair with your favorite cookies and fruit!

Tuesday, December 20, 2022

Potato Latkes

Buncee - Hanukkah

 HAPPY HANUKKAH 

You can not have Hanukkah without Potato Latkes!  We only make these once a year and they are so delicious.  Super easy to make, just a little time consuming but definitely worth the time.


Ingredients:

5 lb bag of Yukon Gold Potatoes
2 large onions
1 Tablespoon salt
1/4 cup Matzoh meal (you can also use flour)

Preparation:

Using a food processor with both the bottom blade and top grater attachment on 
grate two large onions and transfer grated onion to a large bowl.  Next using the same attachments process 1/2 the potatoes and transfer to the same bowl with the onion.  Lastly remove the bottom blade from inside the food processor and just use the top grater attachment to process the rest of the potatoes.  You will now have 1/2 the potatoes as "mush" and half the potatoes shredded.  In a large bowl add all the potatoes, onions and the rest of the ingredients and mix until well blended.

Heat a large skillet with about 1/2 inch of vegetable oil. (If you have more than one large frying pan you may want to use two to make the frying of the latkes go faster).  I like to take spoonfuls of the potato mixture and squeeze out the extra liquid using my hands and place mounds of the potatoes into the hot oil pressing down lightly with the back of the spoon.  Let potatoes get nice and golden brown on one side and then flip them over to brown on the second side.  Once both sides are golden brown remove with spatula and place on paper towels to drain.  Repeat this until all the potato mixture is used up.  Serve hot!

You can store these in the refrigerator and reheat in the oven or air fryer.  Latkes also freeze really well.  Freeze in a single layer and then you can store in a ziplock bag in the freezer and just take out a few at a time and reheat in the oven or air fryer.


Saturday, July 10, 2021

Cripsy Pasta Chips


This is a MUST try.  So super easy and a really surprising yummy and satisfying snack.  We saw this on Tiktok and couldn't resist giving this a try.   I'm adding this to a charcuterie board that I am making for friends and I know it will be a hit.


Ingredients:

8 oz cooked pasta (any shape)
2 Tablespoons olive oil
2 Teaspoons garlic powder
2 Teaspoons Italian seasoning
1/3 Cup parmesan cheese
salt and pepper to taste

Drain pasta well and add all ingredients to cooked pasta and stir to coat.  Feel free to go heavier or lighter on seasoning as you see fit.  Place a small amount of pasta in a single layer in the basket of your air fryer.  Air fry for 10 min or until your chips are golden brown.  Check around the 8 min mark until you can see how long you may need for your specific air fryer.  Enjoy 


Thursday, July 8, 2021

Spinach Basil Pesto


This is a new staple in my house.  I make fresh batches every other day so it is always in a jar in my fridge.  My kids literally put this on EVERYTHING.  My oldest daughter's favorite way to eat this is spread on a piece of crusty bread with a drizzle of balsamic glaze!  Soooo super good and this is really so simple to make if you have a small food processor or blender.


Ingredients:

4 big cloves of garlic
1 1/2 Cups  baby spinach
1 Cup fresh basil
1 Tablespoon pine nuts (omit this if anyone has an allergy to nuts)
1/3 Cup grated parmesan cheese
5 Tablespoons olive oil (more or less to your taste)

Preparation:

Place the garlic cloves whole into your food processor or blender and pulse until finely chopped.  Now add spinach, basil and pine nuts and blend until broken down.  Next add your parmesan plus 1-2 tablespoons of oil.  Blend again until pesto starts to come together.  Add more olive oil until desired consistency.  You can service immediately or cover and refrigerate and store up to a week but it won't last that long!!

Tuesday, April 27, 2021

Chocolate Avocado Pudding


 This recipe is so super simple.  It's a great way to use up your avocados before they go bad.  I'm so tired of throwing avocados when no one eats them.  This recipe is perfect because you can use them right when they get a little too soft to eat them and I always have all of these ingredients on hand in my pantry.  It's also awesome because you throw everything into a blender or food processor and it literally takes less than 5 minutes to make.  It's a super smooth and dark chocolatey dessert!


Ingredients:

2 ripe avocados
1/2 cup unsweetened cocoa powder
2/3 cup brown sugar
1/3 Almond milk
2 teaspoons pure vanilla extract
pinch of ground cinnamon
pinch of salt

Preparation:

Add all ingredients into a blender or food processor and blend until smooth.  Spoon into a bowl and chill in the refrigerator for at least 2 hours to set up.  Enjoy!

Tuesday, April 6, 2021

Honey Comb Candy


I got really into candy making a few months back. Out of all the recipes I tried, my favorite recipe to make was honey comb. Its looks really impressive but it is super simple to make. You can make it plain or dip it into melted chocolate. I have also added chopped nuts to create a honey comb nut brittle (although if you add nuts you do deflate the honey comb a bit). Anyway you make it, it is a real crowd pleaser. At least my work friends think so. I found this particular recipe while searching through Pinterest. The only addition I made was a pinch of salt. You can find the recipe here

Ingredients: 

1 Cup White Granulated Sugar 
1/4 Cup Light Corn Syrup 
2 Tablespoon Honey 
1/2 Cup Water 
2 Teaspoon Baking Soda 
Pinch of coarse salt (optional)

Preparation: Line and 8x8 inch baking pan with parchment paper In a large pot on the stove top, over medium-high heat, add the sugar in an even layer to the bottom of the pan. Pour the corn syrup and honey over the sugar and then pour the water to moisten all the sugar. Do not Stir! Cook mixture until the temperature reaches 300-degrees Fahrenheit on a candy thermometer. Remove the pot from the stove and whisk in the baking soda for a few seconds, until mixture stops foaming up. Pour mixture immediately into prepared pan. Let honeycomb set for at least an hour, or until completely hardened, before breaking into pieces (I used my hands). Option: Coat honeycomb candy in chocolate. Store candy in an airtight container. Candy stays fresh and crunchy for 3-4 days.